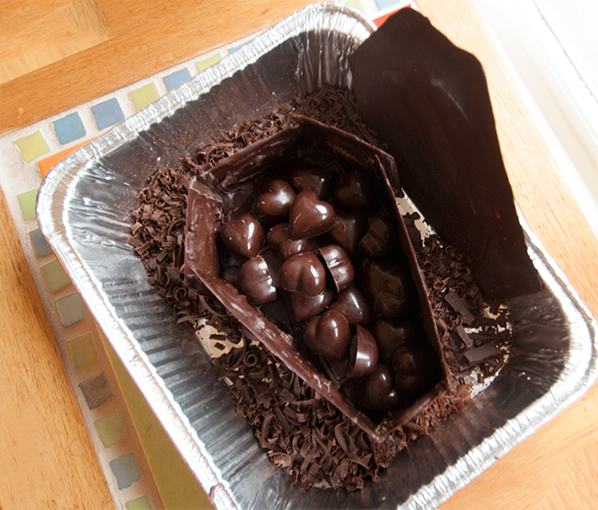
I made a chocolate coffin, this week. And then I stuffed it with dark chocolate bleeding hearts. It was a lot of fun especially with Hallowe’en coming.
My old alma mater, Studio 58, did a production of A Midsummer Night’s Dream, which they are billing as “Shakespeare with Bite” … because the director has set it in the Carpathian mountains and the fairies are vampires who “taunt and terrorize all who wander there”.
I know, I know. Haven’t we had enough of vampires? Actually no, judging by this tongue-firmly-in-cheek, very creative and energetic take on this classic play. The director has a vast amount of experience and knowledge of the Bard, a great sense of humour and a talented cast and creative team, including three young colleagues who worked with us at the Gateway Theatre these past couple of years.
I wanted to make them an opening night gift they could sink their teeth into (sorry).
And how often do you get the chance to make a chocolate coffin?
I looked up pictures of “toe pincher” coffins on the internet. They are the European style ones seen in all the Dracula movies. If I had entered “directions for building a toe pincher coffin” I would have hit the motherload. There are amazing craftspeople out there creating beautiful, bespoke handmade wooden coffins, as well as videos and patterns for making your own. And, on the other end of the spectrum, you can order a cardboard coffin made to look like a box of chocolates from this company.
I looked at many pictures of coffins, went through all my flattish chocolate bar molds, hoping to find some that could work as side slats, realized that none of them were “quite the thing” and set about making my pattern. I made the first set from paper, then used the paper patterns to cut out corresponding pieces from the 8 ½” x 11” acetate sheets I have in stock for making homemade transfer sheets. These acetate sheets are the kind found in office supply stores.
A toe pincher has six sides, widening from the head end to the point where the arms would go over the chest, then narrowing down to the feet at the bottom.
It has been a long while since I have taken geometry, but a protractor and small ruler came in very handy for making the even angles and lengths down both sides of the base, ensuring bi-lateral symmetry. Ms. Haberger (my high school Math teacher, who despaired of my talents) would be proud.
Once I had the base and lid pieces cut out, I measured the four side pieces, and the top and bottom pieces, making them 3” tall (or deep), to allow enough room for a batch of chocolates. The length of each side piece depends upon the dimensions of the base. I do hope that makes sense.
It would perhaps, have been easier to make a rectangular box, but I actually think the six shorter pieces may have made the job easier, balancing their edges on each other at smaller than 90 degree angles. A hexagon (and this shape is sort of a wonky one) is one of the strongest shapes in nature (honeycomb is made of hexagons).
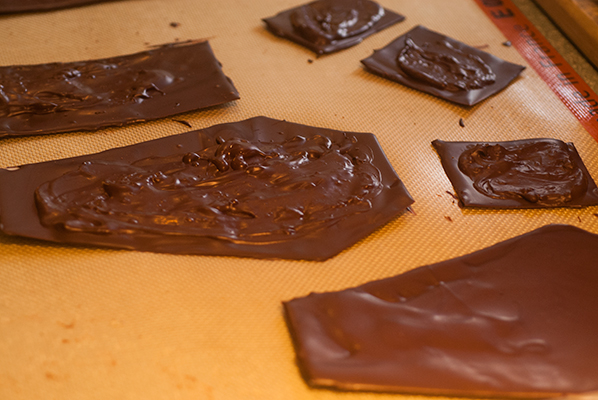
In any case, once I had my pieces (eight in total) cut out of acetate, I laid them out on a large Silpat mat, with plenty of room between each piece.
I tempered 5oo grams of Cacao Barry Bio 71.7% dark chocolate pastilles in a wide glass bowl, then picked up the acetate base piece. Holding its top edge with thumb and forefinger, I carefully dragged the piece of acetate across the surface of the bowl of tempered chocolate. The chocolate covered the surface quite nicely, with a small bit of overhang on the back of the sheet. I carefully laid the wobbly, chocolate covered piece down on the Silpat, and continued with the remaining pieces, until they were covered.
I probably should have left them alone at this point, but wanted to make sure I had a thick enough coating on each piece, so I painted more chocolate on with a silicon spatula. This did not go as smoothly, and I had varying degrees of thickness (and neatness). Ah well, I really needed only one “good side” on each piece.
Once they were dry (this took very little time as they were in good temper, and the temperature has dropped to fall weather conditions), I carefully peeled the acetate from the chocolate and was able to gently flick off any excess from the sides.
I weighed the remaining chocolate (the casket pieces did not use all of it), and re-tempered it with 20% additional seed chocolate pastilles. This became my mortar, for sticking the coffin pieces together.
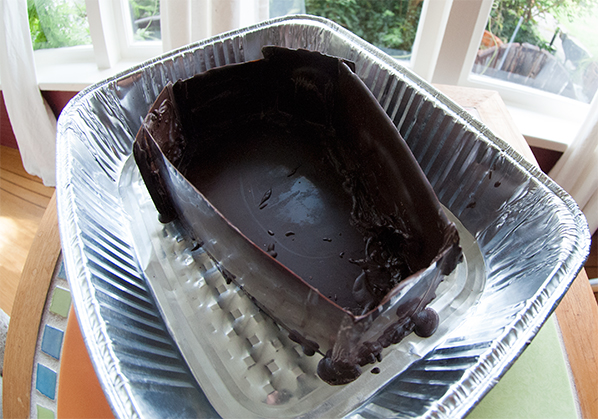
This part was great fun. I laid the base in a small foil roasting pan, the “wrong side” glued down with a dab of tempered chocolate. I then quickly dipped the bottom and side edges of the foot piece and one of the longer side pieces in the tempered chocolate, then “cemented” them to the base and each other, leaning the side pieces ever so slightly on each other, kind of like making a house of cards.
I was surprised at how well this worked. I worked my way around the coffin, until all the side pieces were in place holding each other up. I drizzled extra chocolate mortar down each seam to cover any imperfections or gaps, then left the whole thing to set.
I poured out the chocolate I had left over onto a marble slab, in a very thin layer. Before it had quite set, I scraped the long edge of a metal scraper (the one I use for tabliering chocolate) through the chocolate, resulting in curls and shavings. These became my “rotting forest floor”, and I poured them all around the base of the coffin.
The whole thing had a rugged, weathered “been there for years” look to it – just what I was going for.
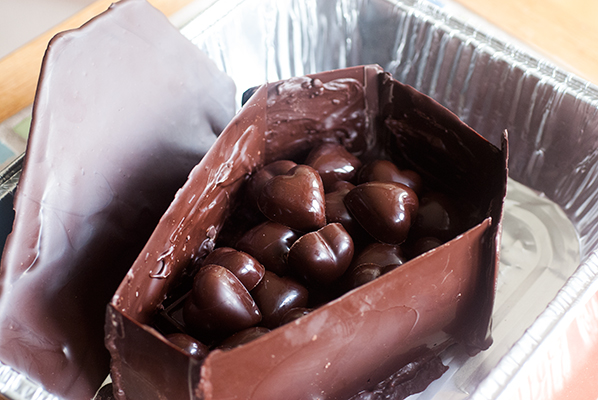
Into the coffin I placed 24 dark chocolate “Bleeding Heart” molded chocolates. These used the same chocolate as the coffin, although you could use milk (I think they look dramatic with the dark).
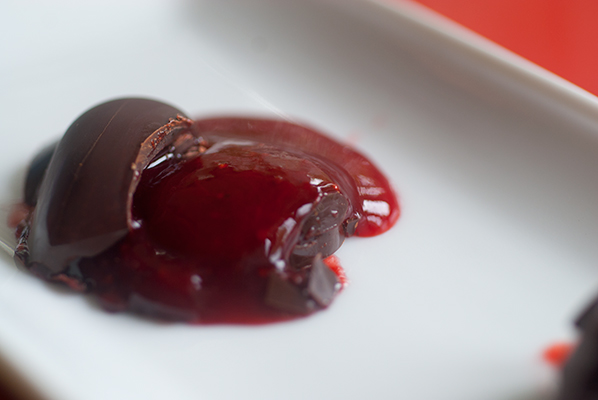
The “blood” interior of the hearts is a “not sufficiently set” strawberry pate de fruit recipe (I used half the pectin requested in the original recipe), which results in a thick sauce, instead of a gelled final product. We use the leftover for stirring into yogurt and pouring on top of pancakes.
Here is the original recipe, thanks to Zoë François of Zoe Bakes.
If it is not important that they “bleed”, I would advise making them the way Zoë does, then blending the finished pates in a food processor, and piping them into the molds.
And here are the changes I made to ensure a “bleeding” finished product:
- 20 ounces frozen strawberries, thawed
- 2 cups sugar
- 1 pouch liquid pectin
Puree the strawberries. Add the berries and the sugar to a medium size saucepan and bring to a boil. Once it is boiling, cook the mixture for 7 minutes.
Once the mixture has cooked for the full 7 minutes, turn off the heat and add the pectin. Stir until well combined.
Pour into a 4 cup glass measure. Let set at room temperature, refrigerate briefly, then bring to room temperature before pouring into prepared chocolate heart molds.
Back the molds with a layer of tempered chocolate, let set and unmold.
I think this would be really terrific with a blood orange pate de fruit interior, as well!
I couldn’t resist putting this on their opening night card:
“Have a bloody good run!”
